Showing posts with label kids clothes week. Show all posts

Thursday, April 23, 2015

Kids Clothes Week: animals all over

Despite a busy week, I'm trying to participate in Kids Clothes Week. This daily hour of sewing is not only a fun challenge, but also a way to relax and unwind.
At least, if everything goes smoothly and as planned. Fortunately, this was largely the case for this little tee.
A while ago I scored this animal fabric at the local fabric market. It's a really nice, thick and high quality knit, and perfect for the theme of KCW (I couldn't find the brand, but found out that it's sold at www.babarum.be in various colorways)
I combined it with some coral/salmon pink for the collar and sleeve cuffs.
As mentioned before, I'm on a mission to introduce more pink in my sons' wardrobes, and I love it. Never having been a big fan of pink, I'm now discovering that there are so many different shades of pink, that can be used in all kinds of color combinations. It has opened a whole new range of opportunities.
Next up, some cool pants for my girl. Let's see how far we can get this week...

Sunday, April 19, 2015

Wild things

Tomorrow, another Kids Clothes Week starts. This season's theme is a fun one: Wild Things. I'm always in for some animal inspiration, and already have a few projects in mind, so stay tuned. To warm up, I have been sewing some fun and simple eared hats for my kids. They love to dress up, and these hats boost their imaginative play.
It all started around Easter when my son's teacher asked for 30 bunny hats for all the kids in her class. Searching for a simple and quick pattern, I came across this free pattern from the Purl Bee. 
The original pattern was sized for babies and included lamb ears. so I enlarged the pattern and added bunny ears. After sewing a couple of bunny hats (fortunately, I didn't have to sew all 30 of them), I wanted to try out some other animals.
Enter the panther!
And the fox!
The pattern is really easy and versatile, and has a great fit. You could line the hat, as I did with the panther version, but if you use fleece, there is no need to line them or finish the edges. I think it looks really cute on my 2-year old, but it's also a great pattern to create dress up hats for older kids. In fact, the fox hat was made for a school play of my eldest. After figuring out the right shape and position of the fox ears, I could whip them up in half an hour.
Are you interested in the enlarged pattern and instructions for sewing on the different ears? Let me know, and I will do a tutorial soon!

Thursday, January 29, 2015

KCW to the rescue!

Next week it's Kids Clothes Week, and I've decided that this will be the week when I'm going to inaugurate my new sewing space. I've dusted off my sewing machines, unpacked the box with sewing equipment, and gone through my stash in search of fabric to upcycle. Ready to go!

Or, that's how it should feel. To be honest, I don't feel very inspired right now. Is it because I have taken such a long sewing break? Or because my kids don't really need any new clothes? The latter was never an obstacle for me, so why is it now...? Is it because I've been crazy busy with work and other commitments? I don't know.
Before...
Anyway, I realized that the purpose of KCW is exactly to help me over this hurdle, by committing myself to sew a little bit every day. So that's what I'm going to do, and hope for the sewing mojo to return.
Cutting out the Charlie pattern from Zonen09
I've decided to start off with some simple things, like patching pants and upcycling a t shirt for my son. Since he has recently declared that his favorite color is pink, I'm sure that he will love this polo with pink, blue, grey and tan stripes. And I'm sure that I will love the fact that it requires only four seams and one hem. It won't get any easier than this...

Thursday, January 15, 2015

8 ways to upcycle jeans

Today I’m contributing to the Kids Clothes Week blog with an inspiration post about upcycling jeans. So I thought it would be fun to give an overview of my own denim creations here.
1. One of the very first items I ever sewed was this cute denim dress for my daughter. Of course, I made a lot of beginner’s errors; for example using some very sturdy jeans, which made the dress rather stiff. Nevertheless, it is still one of my favorite creations. If only because my little girl looked so incredibly cute in it.

2. Next, I upcycled jeans into some colorful skirts (before my life as a blogger).

3. I used denim to create fun knee patches

8. And a sweater with denim details


(Love to see how my little girl has grown in the past five years...)

Need more inspiration? I collected a lot of ideas on this Pinterest board. Or hop over to the Kids Clothes Week blog to read more.

Wednesday, April 9, 2014

zigzag...

One of my favorite creations is the triangle sweater I created last year. My son recently outgrew this sweater, so the concurrence of Project Run and Play's theme of this week (design your own fabric) and the "Sew all 26" series at No Big Dill (which has arrived at Z) formed the perfect excuse to make a new shirt. Since summer is on its way, it became a t-shirt. 
Initially, I wanted to use a fresher colour, but at the fabric market, I simply couldn't make up my mind which colour to choose. So in the end I went with the same colours as last time. I upcycled a huge men's shirt, which, despite having a print on the front and back, still had enough blank fabric.
The pattern was made using discharge paste, a thick bleach-like paste that is perfect for freezer paper stenciling (read all about the technique here). 
I stenciled two tags with the pattern. One was used for the collar, the other one was folded, following the example on this beautiful sweater from Nellekus.

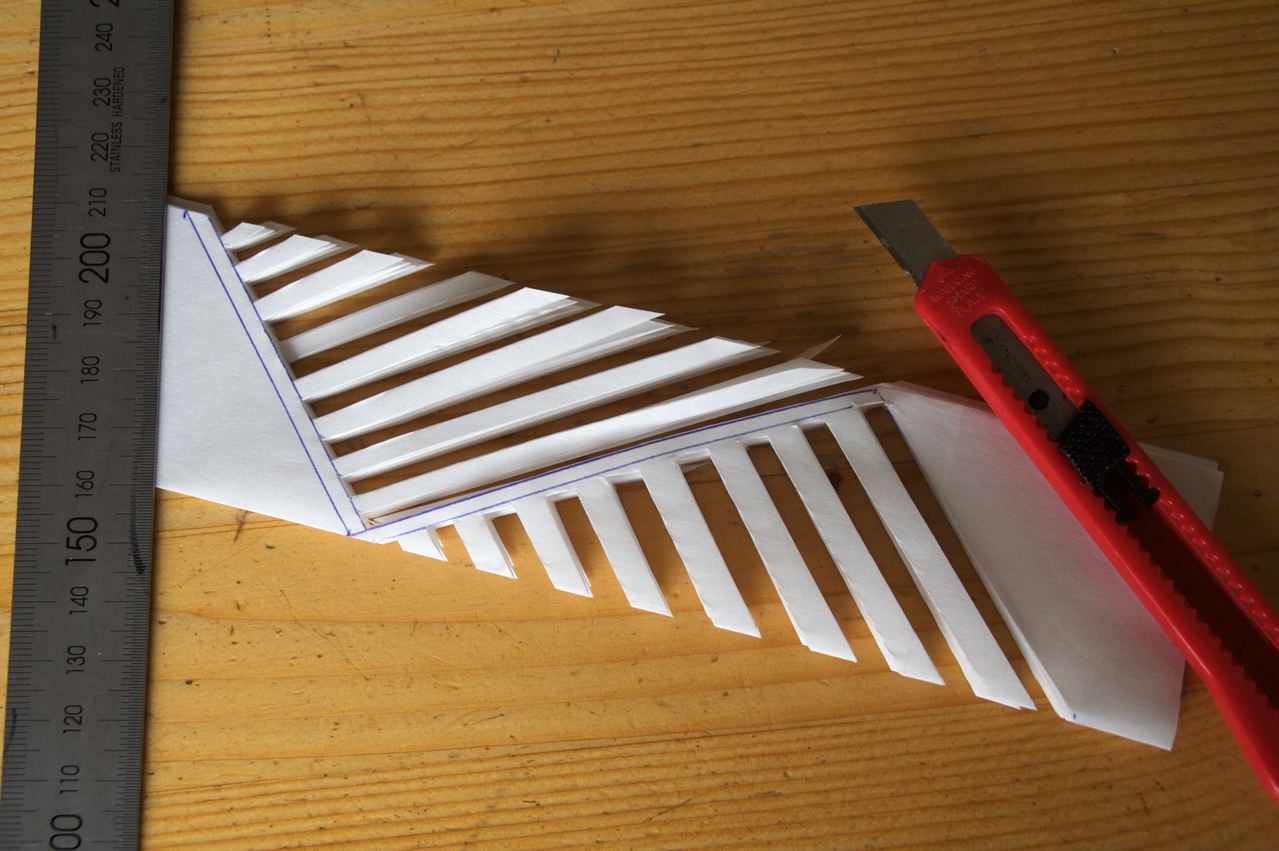
So how did I create the stencil? It looks more difficult than it actually is. Let me show you...
First, I cut a rectangle of freezer paper of about 40x25 cm (using the entire width of the paper).
Fold the paper zigzag-wise into eight parts.
Draw two triangles, like this...
Cut out small strips within the shape of one triangle, using a knife or scissors.
Looking good already...
Cut out strips from the other triangle.
Fold open and admire! 
I accidentally cut out too much here. No problem. You can add the cut-off part(s) when ironing on your stencil.

You can vary the angles, which results in different patterns. As you can see, I used three different patterns for the front, back and sleeves...
In case you wonder, this is my (tomboyish) daughter. Her brother was ill today, but she volunteered to model, in exchange for some M&M's of course...
Linking up to Project Run and PlayKids Clothes Week and No Big Dill's "Sew all 26" series.

Sunday, April 6, 2014

Birch shirt

It's Project Run and Play week 3, and I managed to sew along this week as well. The theme for this week is 'design your own fabric'. I love designing my own fabric, and have tried out different techniques (more about that in a later post). I had lots of ideas, but started with a simple project; another color-blocked pocket tee (see my previous -very different- versions here and here). Obviously, I'm not yet bored of those shirts.

For this shirt, I designed the fabric of a small, but significant part; the pocket.
I was inspired by the birch forest surrounding my office. Two shades of grey, a graphic pocket and some bright green details, to give it a fresh, spring-y look. Again, a very simple upcycle, using an store bought heather grey shirt for the top part.
The pocket was freezer paper stenciled in two steps. First, I simply painted stripes (about 1/2 inch wide) in different shades of light grey. 
When paint was dry, I ironed on the freezer paper stencils. These were just long strips with some notches cut out here and there. I painted over the stencils with dark grey.
And here is the result... Looks like birch trees, right?